
What Are the Real Odds on Stake's Mines Game?

Two formulas drive everything else. Survival probability, the odds you reach a given number of safe reveals, is P(d) = C(25−m, d) / C(25, d). The multiplier Stake pays at that point is 0.99 × C(25, d) / C(25−m, d), where m is your mine count and d is diamonds revealed.
Multiply those two together and you get exactly 0.99, every single time, regardless of how many mines you chose or how far you pushed your luck. That identity is the whole game in one line: cashout timing changes your variance, not your long-run expected value, a point confirmed by tested EV comparisons across mine counts. If you want to skip the manual math, an interactive Mines calculator will spit out multiplier, survival odds, and expected value for any bomb count from 1 to 24. Stakestats' Stake Engine verification tools let you confirm those numbers hold up against your own real-money rounds.
- RTP: approximately 99% (house edge about 1%) on Stake-family Mines builds
- Survival formula: C(25−m, d) / C(25, d)
- Multiplier formula: 0.99 × C(25, d) / C(25−m, d)
- EV identity: probability × multiplier = 0.99 for every cashout point
Key Takeaways
| Point | Details |
|---|---|
| RTP stays fixed | Every cashout point returns 0.99 expected value per dollar staked, regardless of mine count. |
| Two formulas cover everything | Survival probability is C(25−m,d)/C(25,d); multiplier is 0.99 times its reciprocal. |
| Mine count sets variance | Low mine counts (1 to 3) mean steady, small wins; high counts (16+) mean rare, massive payouts. |
| Bankroll rules beat gut feel | Stake 1 to 2% per round at low risk, less than 1% at high risk, with a fixed stop-loss. |
| Verify, don't assume | Save server seed, client seed, and nonce for every round to confirm fairness after the fact. |
| Stakestats ties math to proof | Its Stake Engine tools combine calculator output with real-time RTP tracking and server-seed verification. |
Table of Contents
- Mines Payout Table and Survival Odds by Bomb Count
- How Do Mines Payouts Actually Work?
- How Do You Use a Mines Calculator to Check Your Odds?
- Which Mines Strategy Fits Your Risk Tolerance?
- Worked Examples: Checking the Math Yourself
- How Do You Verify a Mines Round Was Fair?
- Run the Numbers Instead of Guessing Them
- Sources
Mines Payout Table and Survival Odds by Bomb Count
Pull up any mines odds stake chart and you'll notice the same pattern: multipliers climb, survival odds shrink, and the product of the two never budges from roughly 0.99. That's not a coincidence. It's how Stake calibrates the entire multiplier ladder, and it's the reason a mines probability chart is more useful than gut instinct when you're deciding how far to push a round.
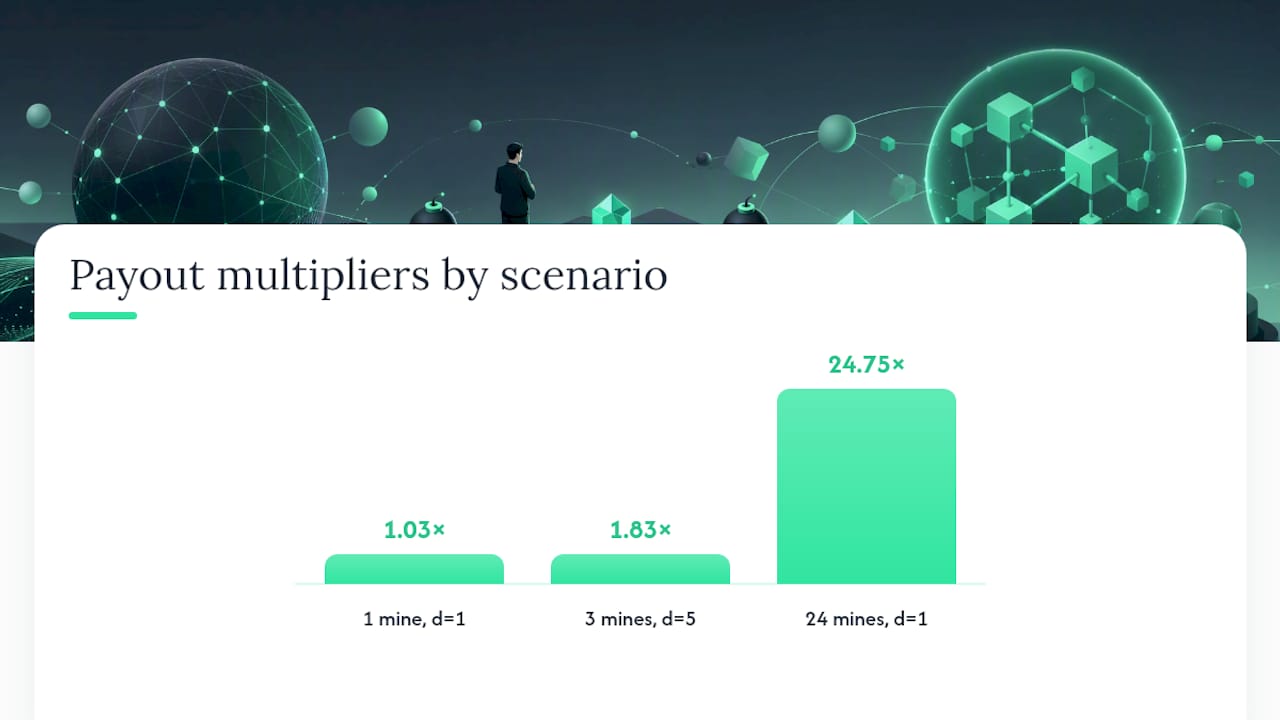
Here's a representative slice of the table, covering a spread of bomb counts and reveal depths that most players actually use:
Reading this table is simpler than it looks. Multiplier is what your stake gets multiplied by if you cash out at that exact reveal count. Survival odds is your probability of reaching that reveal without hitting a bomb, computed straight from the combinatoric formula above. EV is just multiplier times survival odds, and it holds at $0.99 per dollar wagered across every single row, which matches the combinatoric payout chart used by most Mines calculators.
A few rows worth bookmarking:
- 1 mine, d=1: near-certain survival (96%) but a tiny 1.03x return, useful for grinding volume rather than profit.
- 3 mines, d=5: a middle-ground spot where over half your rounds clear that far, paying 1.83x.
- 8 mines, d=5: riskier territory, under a 1-in-4 shot, but the multiplier more than doubles versus the 3-mine version.
- 24 mines, d=1: the extreme end. One safe tile out of 25, a 4% survival rate, and a payout that jumps to 24.75x for a single reveal.
Pro Tip: There's no such thing as the "best EV" cashout point in Mines, since every single one nets the same 0.99 expected value. What you're actually choosing when you pick a cashout depth is how much variance you're willing to carry. Treat the payout table as a volatility dial, not a hunt for an edge.
How Do Mines Payouts Actually Work?
Stake's Mines runs on a 5x5 grid, 25 tiles total, and before the round starts you choose how many of those tiles hide mines, anywhere from 1 to 24. Every remaining tile hides a diamond. You click tiles one at a time; each diamond reveal bumps the multiplier upward following the ladder from the table above, and hitting a mine ends the round with a total loss. Cash out is available after any successful reveal, locking in whatever multiplier you've reached at that moment.
The mechanics behind the math work like this:
- 25 total tiles, mine count selectable from 1 to 24 before the round begins.
- Each safe reveal increases your multiplier according to the survival-probability formula.
- Hitting a mine ends the round immediately with no partial payout.
- You can cash out after any reveal, at any point, for as long as safe tiles remain.
- The layout is fixed the instant the round starts. Nothing shifts based on your reveal order.
Stake first calculates the raw probability of surviving to a given reveal count using the hypergeometric distribution (that's the C(25−m,d)/C(25,d) piece), then takes the reciprocal and multiplies by 0.99 to bake in the house edge. That 0.99 factor is applied uniformly across the entire ladder, which is exactly why the EV identity holds at every step rather than only at a few "favorable" spots.
If you want to check that Stake actually generated a fair, unmanipulated layout rather than trusting the math blindly, provably fair verification exists for that. Every round has a server seed, a client seed, and a nonce; running those through an HMAC-SHA256 hash lets you reconstruct the exact tile layout after the fact and confirm it matches what was shown to you. Stakestats' provably-fair explainer walks through the verification steps in more detail than a quick summary can cover here.

How Do You Use a Mines Calculator to Check Your Odds?
Running the mines odds stake numbers by hand works, but a calculator saves you from re-deriving factorials every time you want to test a new bomb count. Here's the process:
- Set your mine count (m). This is the single biggest lever on volatility. Low counts (1 to 3) mean gentle multipliers and high survival rates; high counts (16+) flip that entirely.
- Set your target reveal count (d). Decide how many safe tiles you're aiming to clear before cashing out, or use the calculator interactively as you reveal tiles in real time.
- Read the multiplier output. This tells you exactly what your stake gets multiplied by if you cash out at that reveal depth.
- Read the survival probability. This is your realistic chance of reaching that point without a bomb.
- Compute expected payout. Multiply your stake by the multiplier, then by survival odds, to see your session-level expected return (which should land near 99% of your stake, confirming the math checks out).
A quick numeric example: say you stake $1, choose 3 mines, and plan to cash out at 5 diamonds revealed. Multiply $1 by 1.83, then by 0.541, and you get an expected payout of about $0.99, right on target with the published RTP.
Pro Tip: Keep the calculator open mid-session, not just before you start. If you're three reveals into a 10-mine round and your nerve is fading, re-check the current survival odds against your remaining bankroll rather than guessing. A five-second calculator check beats a gut-feel cashout every time.
Which Mines Strategy Fits Your Risk Tolerance?
The math doesn't hand you an edge, so a real Mines strategy is really a bankroll and variance plan dressed up as game selection. Four rough risk profiles map cleanly onto mine count:
- Low risk (1 to 3 mines): Hit rates stay above 75% through the first several reveals, and multipliers climb slowly. This range suits players who want volume and long sessions over big single-round swings, a pattern echoed in Stake's own strategy breakdowns.
- Medium risk (4 to 9 mines): Survival drops into the 40 to 65% range for moderate reveal depths, with multipliers that reward patience without demanding suicidal reveal counts.
- High risk (10 to 15 mines): Survival odds fall below 40% quickly, and multipliers start compounding fast. This is where a single bad tile wipes out several rounds' worth of small wins.
- Extreme (16 to 24 mines): Single-digit survival percentages with multipliers that can run into the thousands or, at 24 mines and 1 diamond, over 5,000x, per the full payout chart. Reserve this for tiny stakes you can genuinely afford to lose.
Practical heuristics that pair with these buckets, drawing on the risk-profile recommendations common across Mines guides:
- Stake no more than 1 to 2% of your session bankroll per round at low to medium risk; drop that to well under 1% at high or extreme mine counts.
- Set a cashout target before you start clicking, not after you've already seen three diamonds in a row.
- Use a hard stop-loss (a fixed number of rounds or a dollar figure) and a win limit, and honor both regardless of how the session feels.
- At extreme mine counts, treat every round as a lottery ticket rather than a repeatable strategy.
Same rough payout target, wildly different risk of ruin along the way.
The math is solid, but the mistakes that drain bankrolls usually aren't math mistakes. Gambler's fallacy convinces players that after five safe reveals, a bomb is "due." Chasing losses pushes people into higher mine counts than their bankroll supports, trying to recover a bad night in one round. Misreading a hot streak as skill rather than variance leads players to abandon their pre-set cashout targets right when discipline matters most. None of this shows up in the EV formula. All of it shows up in your bankroll.

Worked Examples: Checking the Math Yourself
Numbers convince better than assertions, so here are three scenarios spanning the risk spectrum, all computed from the same two formulas.
Low-risk session, 2 mines. With only 2 bombs among 25 tiles, survival stays high through several reveals. Expected payout on a $1 stake stays pinned near $0.99 at both points, exactly as the EV identity predicts.
That's the volatility trade in action: fewer wins, dramatically bigger ones, same $0.99 expected return per dollar.
This is the territory where testing across mine counts confirms EV remains anchored to RTP even as outcomes swing wildly from round to round.
Reproducing these numbers yourself just takes a spreadsheet with a combinations function (COMBIN in Excel or Google Sheets works fine). Compute C(25−m, d) over C(25, d) for survival probability, then take the reciprocal and multiply by 0.99 for the matching multiplier. Run through a few mine counts and reveal depths, and you'll see the same 0.99 constant appear every time, which is the fastest way to build real intuition for how mining stake strategy scales with risk. Practical worked sessions also show that over enough rounds, your expected drift lands close to the house edge times total wagered, so 200 rounds at $1 each with a 1% edge nets an expected loss near $2 over that stretch, even though any single session can land well outside that range.
How Do You Verify a Mines Round Was Fair?
Trusting the math is one thing. Confirming Stake actually generated the layout it claims is another, and that's where provably fair tools earn their keep. Stakestats provides a set of tools built specifically for this kind of verification on Stake Engine games, including Mines.
The relevant features include a server-seed and nonce verifier, real-time RTP and hit-rate dashboards pulled from actual game data, and per-game replay tools that let you pull up a specific past round and check exactly how it played out. Verifying a single round works like this:
- Locate your server seed hash (shown before the round) and the revealed server seed (available after you rotate seeds).
- Combine the server seed, your client seed, and the round's nonce, then run them through the HMAC-SHA256 algorithm to reconstruct the tile layout.
- Compare that reconstructed layout against what was displayed during the actual round.
- Save the seed values and round ID for a permanent record, especially if you ever need to dispute a result later.
Pro Tip: Screenshot or export your hand history the moment a round finishes, not days later when the seed rotation has already buried it. A saved server seed and nonce pair is worthless if you can't also produce the round ID it belongs to.
The existence of a dedicated Stake Engine verification tool matters for reasons beyond convenience.
Why the math matters more than the streak
Play only with money you can afford to lose, and treat every mine count above the low-risk range as entertainment spending rather than an investment strategy.
Run the Numbers Instead of Guessing Them
Stakestats exists because most players calculate mines odds stake scenarios once, then play from memory for the rest of the night. That's how a solid strategy quietly drifts into a bad one. The Stake Engine tools tie the calculator math directly to real server-seed verification and live RTP tracking, so you're not just trusting a formula, you're confirming it against your own actual rounds.

A generic calculator gives you a multiplier and stops there. Pairing that number with provably-fair proof and historical hit-rate data means you can check whether a cold streak is normal variance or something worth flagging. If you're managing bankroll across sessions, the bankroll analyzer converts your stake size and mine-count habits into a confidence range for how your balance is likely to move. Start by running your usual mine count and reveal depth through the verification tools and see how your real results compare to the 99% baseline.
Sources
- Stake Mines Calculator - Multiplier, Payout Chart & Strategy
- Mines optimal strategy 2026: tested EV per mine count
- Stake Mines Strategy July 2026: Tips to Play Smarter
- Stake Mines: Calculator & Best Strategy 2026